Life is indeed a stitch!
Berryhill Heirlooms and Susie Gay present techniques, heirloom sewing, hand embroidery and other musings. Come and join in the fun with Susie, a Home Economist, and savor a little rest from your hectic day...and yes, it's a Degree she uses every day!
Showing posts with label 221 Featherweight. Show all posts

Thursday, August 24, 2023

Delectable Mountain Finish Line

 The Delectable Mountain Variation quilt top is finished: Yeah!

I pressed it thoroughly and bundled it up along with the backing (cut about 6" wider all around) and cotton batting and took it to the Long-armer Lori. We talked about designs and chose a slightly variegated off-white thread and I left 'my baby' with her. In a couple of weeks she called to say it was done. Oh My Gosh!!! She did an amazing job on the quilting: very detailed into every little piece of those Delectable Mountains and everywhere else in-between!!! I am so pleased and happy with the results. I darkened the photo to make it easier to see the stitching on the white fabric.

But now it's time to stitch the binding on. I chose a paisley fabric from my stash that is one of the blocks with a tan background that goes with the tan corner points of the Mountains. While waiting for the quilting to be done I prepared the on-grain binding: 2.5" strips sewn together, folded in half and pressed, then wound onto a blue plastic 'card' to stay neat. Sewing the binding to the pieced side was easy on my oldest Featherweight. 

A closeup of the quilting and binding being sewn on....


Then comes the 'hard part' but fun part since I know the quilt will be finished soon. The binding was pressed away from the quilt front, then folded over and pinned to the quilt back. Each corner was mitered as I stitched. 


My goal was to slip stitch one side a day thereby completely finishing the quilt in four days, but I managed to complete it in three days!

The completed Delectable Mountain Variation Quilt (my 5th full size quilt since Covid began)! I love the colors. Each fabric is a memory. Some were fabrics I used to make smocked Bishop dresses for my now-grown daughter. Others are from my Purse Reticule Class that I taught nationwide. Others are from Sewing Machine Mats (another one of my classes I taught) that I sewed as raffle baskets for Sewing at the Beach and Smocking Arts Guild National Conventions. So much fun to stitch after I figured out the written instructions's glitch, and I used up some of my stash: a win-win!


Wednesday, April 6, 2022

Nine Patch Quilt Finished!

I picked up the quilt from my long arm quilter, Lori, and it looks great! I chose a slightly variegated cream/ivory thread so it would show up. It's different, but I like the texture and definition it gives.

Picking the binding was a little tough...went through all my "scraps" big enough to give me the straight of grain 2.5" strips that I needed from the fabrics I used in the quilt. I chose a little floral...it's kind of "pinky/purple". To be honest. it was a tough decision to make colorwise. But I can think of worse things to decide on!

Of course, Eva had to come out and play for this. The whole quilt top was sewn with her so it's fitting she come out and sew the binding together and on the quilt. Love working on her with the Sewing Machine Mat and the cute Dresden Plate Spool Pin Doily


Sewing the binding was easy: 2.5" on grain strips folded in half and pressed. Seam width is 3/8", sewn right side to right side with raw edges even. I set up the machine with the Seam Cloth Guide set at 3/8".
Each side is sewn up to the next corner, stopping 3/8" from the end and backstitched. Then the binding is folded back at a 45 degree angle....
Then fold the binding down over that 45 degree angle so that the fold is aligned with the quilt edge....
Pin that fold 3/8" down from the quilt edge (and fold) and begin stitching again at that pin, again backstitching. It's so easy to do!  Then comes the hard part of folding the binding over to the back of the quilt and hand stitching it down.

I slugged through hand stitching the binding onto the back of the quilt after machine stitching it to the front. I usually work one side a day. I pretty much finished it in the four days allotted. Yeah!!

Here it is folded up on the table after completing it.

Here's the finished quilt on the old bed. It adds some needed color to this attic room. 

While working on this Nine Patch Quilt I was able to design, sew and write the instructions for another Classic Sewing Magazine article for the Fall 2022 issue. It's safely turned in to them, so now it's time to choose another project. Hmmmmm.....have to go through the UFO box again!

Happy Stitching and Sewing to you!

Friday, December 10, 2021

Singer Folding Table: Finished!

It was easy to put the table back together. I only had to watch out for the left and right brackets that hold the machine in place. They are ever-so-slightly different. Luckily I had taken photos of it all prior to taking the table apart

Painting the legs was interesting. I used a box and wooden dowels to hang the legs on to make it easy to paint.

I did have to stabilize the dowels with painter's tape so they wouldn't tip. I roughed up the paint with steel wool and sanding paper. Then had to wait to let the wind die down so I could spray paint outside using a Rustoleum Black Gloss spray paint with several quick, light coats, then let dry overnight. Then I repeated the procedure. It wasn't the best of jobs, but the legs look good.

After drying for at least a day I reinserted the legs into the hinges. The hinge pins, cleaned and ready to  go along with the painted washers, are long and require two steps to get them back into the hinge.

First tapping the hinge pin with a hammier.....

Then screwing it the rest of the way with a short screwdriver. 

Next on the list of restoration was waxing the legs to give them an extra layer of protection. I used the wax I had from The Featherweight Shop for my 1935 Featherweight. They have a new type for sale now. 
 Look at how beautiful the underside of the table looks!

 But after all of this work I ended up with a problem: one leg flops when supposedly closed.....it looks exactly the same as the others that stay closed when the table is folded up.
Hmmmmm........  I screwed the hinge pin in, no luck. 
I removed the pin and put it back in again. 
I checked the curved washer to make sure it was facing the right way: check. 
But the darned leg still flopped. 
There is a spring on the hinge....The Featherweight Shop suggested the problem might be the spring.
So I compared working springs with the floppy one: no luck so far but I ordered four new springs along with some vintage machine feet the machine did not have. 

I love The Featherweight Shop! Their products are great, they respond to email questions quickly, they're a wealth of knowledge easily tapped - free of course - and they ship quickly. Putting the new spring in was a little difficult because the curled end has to fit under a very tight screw in the hinge. But I was keeping my fingers crossed that this would solve the floppy problem. Soaking the screw with 3-in-1 oil and WD-40 overnight losened it enough to take the screw out, then insert the new spring.


After I installed the hinge pin and put it back together.....the leg still flopped. Darn!

Okay, so I re-examined the 'good' legs, and they did not wiggle back and forth when folded down. The floppy leg did, so that was the problem! Too much room between the leg and the hinge frame. Off to the hardware store to buy some washers same size as the original one (the washer laying on the table bottom below). I inserted the new washer between the leg and the frame closest to the hinge pin top (where the red arrow is pointing)

and YEAH! it worked!!!!


The table is finished...thank goodness!! Here's a photo of it all set up with the 221 Featherweight "Eva" and the feet, some old Singer grease (came with the machine...only for show, not to use), her case and the instructions that came with the machine. She's beautiful!

Incidentally, the instructions that came with her are for a tan Featherweight....wonder what the owner did with the original instructions that came with the machine??
It doesn't really matter to me. The machine sews beautifully, purrs like a kitten, so I'm very happy with both the machine and table. Now on to other projects after finishing the Singer Featherweight Folding Table. Happy stitching to everyone!


Thursday, November 4, 2021

Singer Folding Sewing Table: Take 2

 I've been working a little every day on the restoration of my 1947 Singer Folding Sewing Table that goes with "Eva", the matching 1947 Featherweight. I have to keep working on it since it's taking up my husband's garage parking spot :) He needs to see progress to know he can park his car in the garage soon....

After removing the clamps from gluing the veneer I added some of the recommended Howard's Feed-N-Wax on the veneer to nourish and rehydrate. Then it was on to taking the table apart piece by piece.

First off was taking the legs off. Not an easy task because there is one screw (of the five) that is behind the folding mechanism and is REALLY hard to get to. I got two of the legs disassembled but had to call in my husband to get the other two off.


I used 3-in-1 oil and WD-40 to loosen up the screws. We succeeded in getting them all off and disassembled. Each group of parts were put into labeled zip bags for easy assembly down the road.

The leg hinges have hinge pins and washers, which I removed and cleaned. The washers were cleaned, de-rusted with some rust removing goop from a big box store, then painted.


Then I cleaned and polished the hinges using really fine steel wool and Nevr-Dull, a metal cleaning polish. The hinges cleaned up nicely. 
Next was removing the 3 metal brackets that actually hold the machine in place. Okay, two came out easily after a little oil soaked in. But the third bracket was a royal pain....it took 3 days of repeated oil and WD-40 applications to finally get one darned screw to budge. Never underestimate the use of lubricants, and a lot of patience, on a very stubborn screw!

Then the dry rotted leather pieces (that the machine rests on) had to be removed and will be replaced with velcro later on.

I steel wooled the brackets down, and used a very fine sanding sponge to prepare them for spray painting. The brackets were washed to remove any sanding debris and then dried in a low oven...yes, you read that right, a very low (140F) oven on a tray lined with a monogramed dish towel. I wanted to make sure no rust  appeared.


 I also prepared the roughed up, stubborn screw: it had to be filed down on the top to get rid of some rough edges, so painting it is necessary. It was also washed and dried with the brackets.

Rustolem Gloss Black spray paint was perfect for these parts, and will be used on the table legs as well. I used a cardboard box with a cardboard packing crate on top to set the brackets on and spray painted them (and the screw).


Two coats on each side and they look like new!

So far, so good. I like working on small parts first, a little every day. Next I'll tackle the black edges of the table top and the underside. Maybe by the weekend I'll have the table finished!


Wednesday, October 27, 2021

Singer Folding Sewing Table: The Start

 After restoring the 1947 Singer Featherweight that I purchased in Apex, North Carolina a few months ago (as another pandemic project) I finally am able to work on the "matching" vintage sewing table. I'm assuming Eva, the previous owner, purchased the two together, just as I did from the store in Apex. 

These were really cool, useful tables. They look like a card table when the insert is in the top, and it folds up like one, too. The top is a beautiful wood veneer, and the sides and metal legs are black. Singer made sure the folding table could be used for more than a sewing table! The photo below shows exactly how mine will look after I restore it....hopefully.


Just like "Eva" the Featherweight, my table suffered some water damage along one edge of the table top. My detective hat tells me it, and the machine in it's case, were stored in the same place together. The case had water damage in the bottom and the machine did, too. It's not uncommon to find tables and machines that need TLC because of some mishap.

After doing a bunch of research on what to do, I settled on a wonderful blog post that explains the entire process: "Refinishing a Vintage Singer Sewing Table" at Still Stitching. I made my list of supplies and was able to get most all of it (except for the black Valspar furniture paint) at my local hardware store to the tune of about $56. So to begin.......

I found a twin mattress cover in the linen closet to use for padding on the garage floor. Perfect size. I grabbed a clean rag and wet it to wipe the table down from top to bottom. Then the glueing began. 

The veneer on the water damaged side had a few places that needed glue. I squeezed a bit of glue onto one of the brushes and dabbed it in and under the veneer, then wiped away any excess with the damp rag. I had some small clamps to use, but they're lightweight for only a single, small repair.

I used cheap brushes from Dollar Tree with the Gorilla wood glue. Some of the varnish is coming up in one corner...not sure what I'll do with that just yet.
But the rest of the table top is in pretty darned good condition considering it's age of 74 years (hopefully I'll look as good at that age!!).

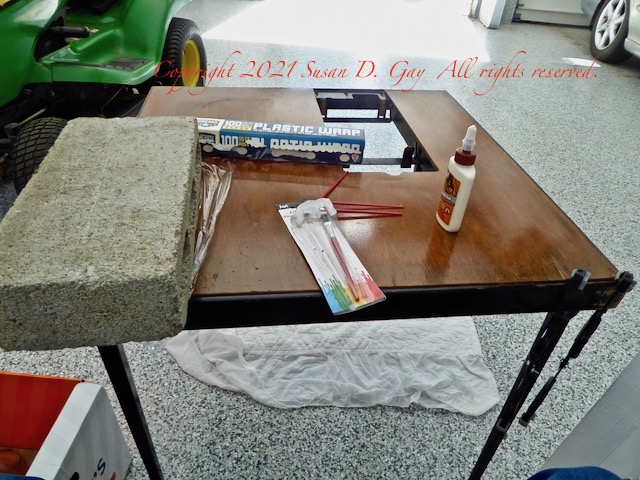
I found another place to glue: the left corner. But I wondered what to use to weight it down since I had no more clamps....Necessity is the Mother of Invention: a heavy cement block!!  After glueing I put some plastic film down to keep the glue from sticking to the block, and the block, from damaging the table. 

I located another small spot on the right...but what to use for this one? How about a bag of leftover fire pit glass rocks with plastic underneath. Heavy enough and again, it works like a charm.
So much for the first day of work on the Singer Folding Sewing Table. The glue has to set for 24 hours, then I can move on to removing the hinges and legs. I love bringing these vintage Singer items back to life!


Friday, August 20, 2021

Drunkard's Path Quilt Finish!

It's done. Another UFO is completed. And I can't believe I designed the whole quilt around the vintage purple and white Drunkard's Path squares.

This is my third quilt made and completed in a year and a half thanks to the pandemic. Many, many thanks to wonderful Lori M. who long arm quilted two of the quilts including this last one. She did an outstanding job on the Drunkard's Path Quilt using all different designs to fit the various squares and relate the designs back to the original Drunkard's Path squares.
After getting it back from Lori I brought Eva, my new Featherweight, downstairs to the dining room table (for more room) to sew the French bias I had ready to the quilt edges. Notice the little acrylic square on the needle right: it's an ingenious gadget from The Featherweight Shop, their Adjustable Seam Guide. It's very easy to use and comes with instructions and the screw and washer to set it up to the correct width. I'm using my 6" ruler to measure from needle to the seam guide. 
A French bias is just a bias strip folded and pressed the long way so there is one raw edge and one that is a fold. The raw edge is lined up to the already trimmed and ready (again by Lori) quilt right side raw edge.
Corners are folded up and back down to get the diagonal fold with stitching stopped before the corner and started again after the corner. After it's all sewn on the bias is pressed away from the quilt in readiness for hand stitching it down. 

The bias is folded over the quilt to the quilt back and stitched down, and the corner folds are also stitched both front and back. I sewed one side a day...Love having a goal and knowing when it would be completed!

I'm so happy to have designed this quilt! Another UFO completed, so what next?? Besides working on an embroidery project I could start to tackle the Featherweight Folding Sewing Table....

Happy Stitching!

Thursday, July 29, 2021

Featherweight Love 3

Today I could only do a little work on the 221 Featherweight: I cleaned and spray-painted the "nut" that holds the drip pan cover on the machine. I also ordered some black paint from The Featherweight Shop for touching up the paint that's gone from the bottom edges of the machine. Whoever owned this one really banged it up around the base (where the screwdriver is pointing) but it's fixable.


The Featherweight Shop must think I'm crazy for continuing to order items and instead of putting everything all in one order. Oh well....shipping is free using First Class mail.

So to keep moving ahead on the restoration, I'm working on the case. First I cleaned the whole case, inside and out, gently with damp paper towels. Easy!

Then according to the Featherweight Shop's video I cleaned all metal with Nevr Dull, a metal cleaner, the can behind the case. The shoe cloth sitting on the case is great for polishing.


You can see the difference on the back hinges from grubby


to bright and shiny. I used the blue gloves for this (ones left over from the beginning of the pandemic): great to use to protect my hands from the chemicals.

Then I brought out the wood glue and damp paper towels to glue down any of the loose Tolex (the black "fabric" covering the case inside and out). I used cheap paint brushes from the Dollar Store to apply the glue.

The bottom of this case was pretty wrinkly but now looks better. I'm only working on the outside of the case right now: inside will come later.

Then it was drawing time with large Sharpie permanent black markers to cover marks, etc. I used them (2 markers) over the entire surface, then used Kiwi Scuff Cover over the case outside and the handle. Luckily, the handle is in great shape and will not need to be replaced.

Next will be using Kiwi black shoe polish all over the outside and buffing to a nice shine...but that will be another day.