Life is indeed a stitch!
Berryhill Heirlooms and Susie Gay present techniques, heirloom sewing, hand embroidery and other musings. Come and join in the fun with Susie, a Home Economist, and savor a little rest from your hectic day...and yes, it's a Degree she uses every day!
Showing posts with label Medallion Quilt. Show all posts

Friday, April 16, 2021

Medallion Quilt Finish!

This project that I've had in my head and now finally finished was about a five year journey. Do you have projects like that? It's such a wonderful feeling of accomplishment when it's completed!

This quilt was a unique project for me since it started with the Colonial Williamsburg Restoration Inc. (copyright 1959) linen toile as the centerpiece. I used the selvages of said linen piece in the borders around it to document the importance of the center.


It was not a perfect square, but close to it so succeeding borders had to be slightly adjusted to make it around the medallion. Designing everything as I went was a quilting journey for me, searching "medallion quilts" and reading books to figure out all of the borders. But I enjoy a challenge.

The last border to be quilted was another "Borders Made Easy" design that I also echoed (just like the first one) to fill it out a little bit using my quarter inch foot.
It was a bold choice to machine quilt this Kona cotton cream border in the King Tut Chalice (#970) thread with variegated colors of wine to camel. Sort of sticks out, you know...highlighted the experience of the quilter. Well, it's not perfect but I'm satisfied because I don't think any quilt is "perfect" when handmade.

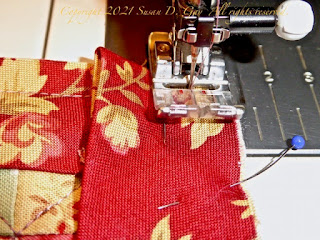
The bias binding was already made: made it when I made the binding for the Cream and Sugar Quilt I finished last year. So after finishing quilting and basting around the circumference of the quilt I trimmed off the excess making sure the corners were square. Stitching the raw edges together with a 3/8 seam made easy work, covering the machine basting. I mitered the corners using instructions from "Floral Bouquet Quilts from In The Beginning" by Sharon Evans Yenter. This photo below shows some stitching on the left, folding the bias at 45% then fold down, and restarting machine stitching on the next side. Pretty ingenious as long as you keep to the 3/8" seam.


After pressing the binding away from the quilt I hand stitched one side or more of the binding to the quilt each day and completed the stitching in three days.

The red binding really sets off the quilt top and compliments the quilt back floral fabric. I'm really happy with this project because I learned a lot and it's one more project completed!

Except I have enough fabric left to make matching pillow shams.....oops, another project is born!

Thursday, April 1, 2021

Medallion "Borders Made Easy"

 I've been working every day for an hour or two on this quilt. The last quilt-in-the-ditch border is a piano key design, so named for the strips used and sewn together to resemble piano keys. The one I used I nicknamed an "offset piano key" border because it resembles black and white key piano keys. 
You can see the quilting-in-the-ditch design I decided upon in the photo below, second from right, even though it's a bit blurry.
Basically it's two trips around the border with lots of turns using the machine's "needle down" feature. It took about four days to do this, a little every day. There are two borders that will have designs using Borders Made Easy, a product from "Quilting Made Easy".

I discovered this product by chance looking around at several quilt store websites. It comes with 26 feet of design and four corners in each package. The designs are rated by difficulty, the 100 level is for me, a beginner in sewing machine quilting. And it's very easy to fit the design to the length needed since the sides of the roll are sticky: you can just cut, reposition and re-draw lines (if needed). 
Just don't stitch over the sticky parts according to the instructions. The corners are just pinned...no sticky stuff on those. Sewing these easy borders is done with a regular foot: no free-motion quilting. I chose an open toe foot to make it easier to see the solid and dotted lines on the paper.
This design is four trips around the quilt on each side. It took about and hour and half to do. Then you just pull off the sticky sides first and then remove all the other paper pieces. I didn't find this a problem since I'm used to doing this in heirloom machine sewing. As a matter of fact, this particular paper is easier to pull off!
Here you can see the sticky borders are removed with just the center left to do. I have one more border to do. It's wider and on the cream Kona cloth so my stitching will have to be really good. I think I'll save that for next week, along with the binding. I can't wait to finish this quilt and move on to other projects!!


Thursday, March 18, 2021

The Medallion Quilt Revisited

It's time to pick up old projects and bring them to the finish line. The Medallion Quilt I've written about before is at the top of my list. I cut out the backing last week: no need to sew it up since it was very wide. The cotton batting was steam pressed and cut to the backing size. The pieced top had to be pressed thoroughly again even after hanging on the banister railing. I've gone over my book ( Heirloom Machine Quilting by Harriet Hargrave, the evised and expanded third edition) to start the next steps on my way to machine quilting this one myself....gulp. 

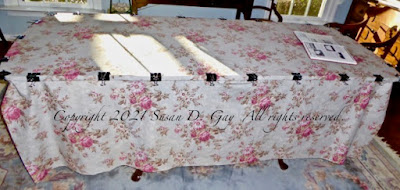
First the table top was measured to find the centers of each side and marked with a piece of painters tape and a toothpick stuck under it at each center. The toothpick helps you to find the center marks when laying out the fabric. First the pressed quilt back, right side down, is matched to the center marks and slightly stretched and smoothed when clipped with the clamps. 

Next the cotton batting is laid onto the backing, again centered.
Then the pressed quilt top is  put down and centered. It's so easy to feel the taped toothpicks to align the centers. I used my hands to smooth everything out.

Then I pinned the layers together starting in the center and working out towards each corner. The pins have to be about 3-4" apart and not in an area where it is stitched. Then I followed the book instructions to put all three layers together using very large clips and LOTS of quilt safety pins...600 to be exact!

After the quilt center is completely pinned, the quilt is shifted over to one side of the table to expose the other side on the table top. The backing is again slightly stretched and smoothed and clamped. The other side of the quilt (including the pinned center) hang over the table side and the combined weight keeps it all smooth. This side is pinned, and the quilt is shifted over to the other side to expose the unpinned remaining side and the process is repeated.  

Next is the machine quilting of the Medallion center...I'm a little hesitant but onward and sew-ward I will go!


Sunday, May 17, 2020

Medallion Last Border

The Cream and Sugar Quilt is out the door and into the hands of Lori who will quilt it on her long arm. So I dived into the Medallion Quilt's last border. All of the sections of the 'Piano Border' were done...they just needed to be put onto the quilt along with the pieced corner blocks. It was a bit of a "goat rope" getting it all together. Each long border was pinned and carefully stitched.

The finished quilt top hanging over the railing!!  I really like the final border. I have enough of the dominate red fabric to make the French bias binding to bring it all together. That was shear serendipitous luck because I had no idea how much fabric to buy with no design in mind when I purchased it all.
I went ahead and made the French bias for both the Cream and Sugar Quilt and the Medallion Quilt since I had all of the equipment set up. After cutting lots of bias strips I pressed each seam open and then began pressing it in half lengthwise. (Note that I wrote "pressed" not ironed!  Ironing, that back and forth motion over the fabric, can stretch the bias. Pressing, an up and down motion, doesn't.) It's a lot of bias for a bed sized quilt and I didn't want to wrap it around a flat piece of cardboard that would put creases in it while waiting for quilting to be done. So I grabbed a leftover bolt board that has rounded sides.....perfect for wrapping the bias around!!
Being my nerdy self I figured out a way to do this task efficiently and quickly.....board on the right and press from right to left.
 Then wrap pressed bias onto board from right to left and repeat.
Now I have the bias for both quilts neatly stored on the bolt board ready when I need it.
I do love it when a plan comes together!


Wednesday, May 6, 2020

Medallion Quilt Quarantine

Ah, yes....more time, more projects to work on. I finished the Cream and Sugar quilt top. I'm waiting for the cotton batting to arrive before bundling it up and taking to the long armer. And I ordered the batting for the Medallion quilt at the same time (I dislike paying for shipping, don't you?). Here's the top hanging over the upstairs railing.
The Medallion quilt top is close to being finished so I'm really motivated. I moved into the dining room to work on it as my sewing table is very small and the quilt is getting too big! I decided to add a small border in the cream Kona cotton to offset the previous pieced borders before adding the new (and final) pieced border. I purchased a quilt book at a thrift store a while ago that I knew would come in handy for this project: "Pieced Borders The Complete Resource by Judy Martin and Marsha McCloskey, copyright 1994".
It has been perfect for me, a novice at designing quilts. The selection of different border treatments in the book and all information pertaining to them has proved invaluable. I knew in my mind what I thought I wanted to do and this book clarified my ideas. I decided on a type of log border called "Keyboard". The book has wonderful pages of borders with the related pattern pieces on other pages in different sizes.


A close up of the border I chose:
I traced the pieces onto paper from the book so I had a visual with measurements on them to help when cutting pieces with mat, ruler and cutter. So helpful! (The pattern pieces in the book have no measurements on them.) There are four pieces to cut for each "block" of this modified log cabin border. Below are piles of pieces and partially sewn ones, ready to get stitched into a border.
I so love the colors, working on the featherweight and sewing away the hours in quarantine!

Monday, April 29, 2019

Medallion Quilt: 2 Steps Forward, 1 Step Back

I've been so busy ordering supplies and fabrics for the California Stitch-In and the Holly Berries Chapter Workshop (August in NJ) that I've barely had time to work on the Medallion Quilt I'm designing. And by designing I mean two steps forward and one step back but more about that later.

I sewed five-inch wide ivory Kona cotton borders to match the Medallion linen. I think a detailed quilting design, maybe in a red thread to match the Medallion, would be unusual and interesting on them. Next was a two-piece 3" (finished) square border sewn to the white borders using several fabrics. Here are the color choices in a mess of squares at my machine ready for assembly:

I decided on this sequence for them:
One of the steps back were the Kona cotton borders. I failed to correctly measure the top/bottom and sides of the quilt and then cut each white border to size. Well, I ended up with a wavy border that wouldn't lie flat. So I spent over an hour Sunday afternoon removing each border and THEN cutting to the correct size. Lesson learned and another opportunity to excel. After sewing them back on I sewed up each new pieced block border: 20 blocks on each side and 22 blocks for top and bottom. 

But there was one problem. The quilt, hence Medallion, is not a perfect square. It's one inch different between top/bottom and sides (sides are shorter). Oops...another opportunity to excel. I decided the best approach was to stitch each seam (except for each end square that has to match the top/bottom
square) again 1/32" in from each first seam for the sides. It would make the 20 squares fit perfectly and each "smaller" square would not be noticeable in the big picture. Here's a corner photo of the result.
I like the result so far.
The quilt is hanging over a stair rail for me to look at every time I pass by. Gives me something to think about for the next step. I'm getting close to finishing and am excited just thinking about sending this out to a long arm quilter (no, I'm not hand quilting this baby) and seeing it completed. Just have to decide how large I want this to be. Do you have any suggestions for the next row or two? If so, please send me your ideas. I would love to see what you think would work!

Wednesday, March 6, 2019

That Medallion Quilt: Design as I Go

I finally decided to get back to that Medallion Quilt I started a year ago. I was at an impasse as to how to proceed... procrastination! In my mind I knew I wanted to take it with me to the recent sewing retreat I attended, along with The Beast...The Singer 99K (heavens, it must weigh at least 35 pounds). I figured the machine would help me get in the mood to work on the quilt. After researching more medallion quilt designs online I knew the best way to proceed was one border at a time, sort of a design-as-you-go method. And I wondered why do I always pick out difficult projects to do? Why couldn't I just choose one of those quilts that supplies all the fabric, gives detailed instructions and you just follow along.....

 
I first decided I wanted to make a row/border of half triangle squares...I thought they would bring in all of the fabrics and not use too much since I really didn't know how much I needed in the first place to make this queen size quilt. I carefully cut strips, then squares, then cut those into triangles and sewed them together. Lots of them.... Then I stitched those into strips....but Oops, I didn't like the way they looked against the bordered medallion.

Back to square one. So I started taking fabrics and laying them up against the medallion, and eureka! A 4" wide border of the dark red floral really looked good. And it was simple...yeah!

Then on to another border after getting home. After carefully measuring (the medallion is not perfectly square...another challenge) I realized I could make four-block squares starting with 2 1/4" strips of fabric. After stitching two different strips together I cut them into 2-block strips, and then sewed those together to make the blocks. Then the blocks together into a long strip for each side....you quilters know the drill. I stitched this fairly randomly. Here's a corner of the quilt top.
The Medallion Quit so far: I like it.
I'm going to hang this over the banister so I can see it regularly and ponder the next border. I have some ideas about what should be next: a solid border of cream muslin? What do you think?