Life is indeed a stitch!
Berryhill Heirlooms and Susie Gay present techniques, heirloom sewing, hand embroidery and other musings. Come and join in the fun with Susie, a Home Economist, and savor a little rest from your hectic day...and yes, it's a Degree she uses every day!
Showing posts with label Whitework Button. Show all posts

Friday, July 27, 2018

RSN Whitework Button 3

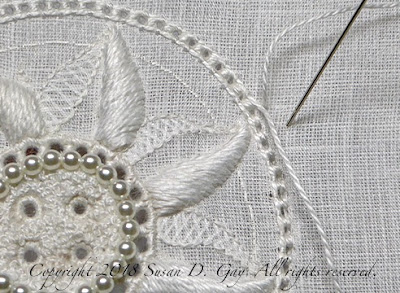
It's done! I've finished the embroidery on the "Scabiosa Whitework Button" designed by Jenny Adin-Christie. I worked diligently on the Ladder Stitch Outline. Here the left side of it is completed and I'm working on the right side (but the needle is parked). You can see the thread that's being couched heading down to the bottom right corner (Retors 8). The needle will go into the hole directly across from where it's coming out of the fabric and over the Retors 8, then on down the line with a back stitch and a couching stitch. It's fun to do.
 Next I had to tackle the cutwork...one was done in class and three to do at home. These are easy to do. It's sort of like an eyelet.
Each cutwork triangle was a sightly different size. And they're done!
I had decided to not make all eight "triangles" in cutwork:  too repetitive for me. The instructions suggested using "free form" eyelets to fill some of them. They're made to fill the space as needed and create interest. They are not meant to be perfect round eyelets, but you still have to wrap all the edges. Here's the result:
Next step is to carefully clean this lovely piece. Even though I washed my hands each time I stitched, the piece still gets soil and oils on it. After it's cleaned and dried I will decide whether to mount it as a framed piece, or as a brooch to wear. What do you think?
Thursday, July 19, 2018

RSN Whitework Button

I've brought out one of my Royal School of Needlework (RSN) class projects to work on: the Whitework Button "Scabiosa", designed and taught by the preeminent teacher, Jenny Adin-Christie. It would be so lovely to finish and wear it. The class bag was hanging on a door knob in my sewing room for way too long, neglected and ignored. Sigh....
I figured I would work every day on it and try to get one technique or section done each day. A lofty ambition, but sort of doable. The idea was to get myself working on it on a regular basis. Part of most techniques were done in class, but I still have a lot to do.

Here's what I've accomplished so far:  I finished the Beading (that little ring of holes around the center) and the four single eyelets also in the center (some of which you can see in the photo below). Then I stitched on the circle of pearls. In between the pearls and eyelets I laid down two layers of padding, basically a satin stitch in Floche, each in a different direction. Then a layer of French knots, some one wrap and others two wraps, to develop some contouring in the flower center.

Then it was on to starting the Slanted Satin Stitch Petals, two of which were already done in class that you can see above. I had to outline each petal half with split backstitch to create a wall for the next step: padding. You can see the padding completed (but not satin stitched yet) in the photo above.
Tomorrow I will tackle the padding in the five petals that are left, and the next day I will do the satin stitches over the padding. I can't wait to finish this project!!