Life is indeed a stitch!
Berryhill Heirlooms and Susie Gay present techniques, heirloom sewing, hand embroidery and other musings. Come and join in the fun with Susie, a Home Economist, and savor a little rest from your hectic day...and yes, it's a Degree she uses every day!
Showing posts with label Jenny Adin-Christie. Show all posts

Tuesday, August 7, 2018

Button Brooch

It's done. Finished....yeah!!! One goal completed. The RSN "Scabiosa" Button class (taught by Jenny Adin-Christie) I took at their Williamsburg classroom is completed. Here are the steps:

After very carefully cleaning the piece and drying it for several days I cut away the linen and backing from around the button (the fabric that held the embroidery in the hoop). You can see the sheer fabric in this photo that was left. Then the instructions said to sand the acid-free cardboard disk to bevel the edge. I next applied a cotton pad to the disk (again carefully trimmed) with supplied archival glue.

Here the piece is pinned to a tan linen backing, centered, and I started stitching a gathering (running) stitch around the button with the supplied Nymo thread. The running stitch was positioned about 10cm from the ladder stitch edge to allow for turning over the cardboard.


The the gathering stitch was pulled up and over the edge of the padded cardboard with the design centered on the front side. The padding is against the wrong side of the embroidery. After gathering it up, the lacing was begun with the Nymo thread. Lacing is done going back and forth around the circle, say, from 12:00 to 6:00, then 1:00 to 7:00, and so forth, circling around the disk until it's perfectly tensioned around the circle. The last step was to sew a brooch pin to a pre-cut piece of wool felt I had on hand, and then glue and slip stitch that to the back of the Scabiosa button.

Here's the finished project!!! I'm so pleased with the results. I learned a great deal from Jenny's wonderful classroom instruction and fantastic written instructions.


Friday, July 27, 2018

RSN Whitework Button 3

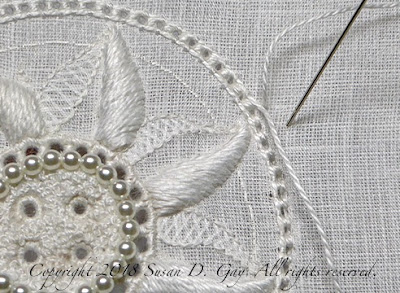
It's done! I've finished the embroidery on the "Scabiosa Whitework Button" designed by Jenny Adin-Christie. I worked diligently on the Ladder Stitch Outline. Here the left side of it is completed and I'm working on the right side (but the needle is parked). You can see the thread that's being couched heading down to the bottom right corner (Retors 8). The needle will go into the hole directly across from where it's coming out of the fabric and over the Retors 8, then on down the line with a back stitch and a couching stitch. It's fun to do.
 Next I had to tackle the cutwork...one was done in class and three to do at home. These are easy to do. It's sort of like an eyelet.
Each cutwork triangle was a sightly different size. And they're done!
I had decided to not make all eight "triangles" in cutwork:  too repetitive for me. The instructions suggested using "free form" eyelets to fill some of them. They're made to fill the space as needed and create interest. They are not meant to be perfect round eyelets, but you still have to wrap all the edges. Here's the result:
Next step is to carefully clean this lovely piece. Even though I washed my hands each time I stitched, the piece still gets soil and oils on it. After it's cleaned and dried I will decide whether to mount it as a framed piece, or as a brooch to wear. What do you think?

Sunday, July 22, 2018

RSN Whitework Button 2

I've been purposefully working on the Scabiosa Whitework Button, designed by Jenny Adin-Christie,  a little each day as promised.  I've completed the padding on the half petals, all three layers, with two of Long Split Stitch. These petals have some serious contouring! And have just finished the slanted Satin Stitch Petals with the satin stitch over top of the padding using Retors 8 (an S-twist thread)......Whew!
Next is the Ladder Stitch Outline, some done in class over a year ago. You can see it in the photo below at the top: it's that curved row of little square holes...looks a little like entredeux. I will have to reacquaint myself with the instructions but it shouldn't be too difficult. Jenny's instructions are absolutely wonderful!

The last step is to complete the filling between the petals with either cutwork (you can see the one completed cutwork in the photo above) or I can put in free eyelets to fill the triangle area, or some of both. Tomorrow I'll work the cutwork.....