This project that I've had in my head and now finally finished was about a five year journey. Do you have projects like that? It's such a wonderful feeling of accomplishment when it's completed!
This quilt was a unique project for me since it started with the Colonial Williamsburg Restoration Inc. (copyright 1959) linen toile as the centerpiece. I used the selvages of said linen piece in the borders around it to document the importance of the center.
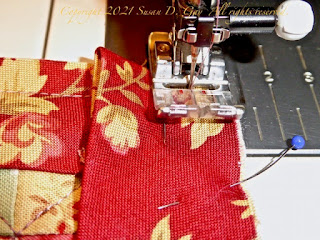
The bias binding was already made: made it when I made the binding for the Cream and Sugar Quilt I finished last year. So after finishing quilting and basting around the circumference of the quilt I trimmed off the excess making sure the corners were square. Stitching the raw edges together with a 3/8 seam made easy work, covering the machine basting. I mitered the corners using instructions from "Floral Bouquet Quilts from In The Beginning" by Sharon Evans Yenter. This photo below shows some stitching on the left, folding the bias at 45% then fold down, and restarting machine stitching on the next side. Pretty ingenious as long as you keep to the 3/8" seam.
After pressing the binding away from the quilt I hand stitched one side or more of the binding to the quilt each day and completed the stitching in three days.
The red binding really sets off the quilt top and compliments the quilt back floral fabric. I'm really happy with this project because I learned a lot and it's one more project completed!
Except I have enough fabric left to make matching pillow shams.....oops, another project is born!


Lovely! You did did a great job on this quilt!
ReplyDelete