Sewing girls just want to have fun and that includes making something out of the ordinary, something just plain fun to do and totally different from fine, detailed sewing and stitching. And I get a kick out of making something out of scraps and relatively nothing. So, enter the Pattern Weight. I was fortunate to observe one of the ladies at my recent Workshop for the Seaside Smockers (a Smocking Arts Guild of America guild) in Virginia Beach. She laid out these pretty pattern weights to hold the paper pattern onto the silk for the Purse Reticule Outside Cover pattern piece. They immediately caught my eye because each was in a different color and my little antennae went up thinking "I could make those...so cute!". Now this isn't knocking pins. Pins are absolutely essential for laying out a pattern onto fabric, especially for a complicated pattern with lots of little pieces. And I have all kinds of pins. But every now and then pattern weights are a quick, easy and efficient way to lay out a pattern and cut it out. So off I went to the big box hardware store to find big, heavy metal washers....
I found the washers in the hardware aisle in bins. They're big, rough and heavy. Definitely have to be covered with fabric to keep the roughness from snagging delicate fabrics!
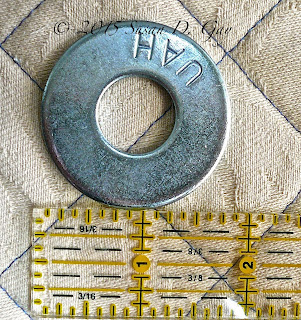
This is what they look like. They were the biggest ones I could find and are approximately 1 3/4 inches wide. The price was right at $0.46 each. This one was the smoothest one of the bunch. They're heavy enough for patterns and light weight fabric but you could easily double or triple them up to make a heavier single weight. And what's not to like about the price? Then I headed home to sort through my bias tape bag...
 I knew I wanted different colors of tape so I gathered my supplies: weights, my bobbin box filled with different colors of thread for the tapes, scissors, and of course a needle from somewhere.
  The best bias tape (holds the curves well) to use is the 1/2 inch wide SINGLE fold. Double fold is too thick and won't hug the curves well. Plain ribbon would not work since it has no real bias. If you have 1/4 inch double fold you can press it open to make the 1/2 inch single fold tape as in the photo to the right. Thirty inches of bias tape is a good length for a single weight. Add more tape if the weights are doubled or tripled.
 Next I selected several colors from my bias tape bag which revealed lots of choices from old projects, packages of tape from thrift stores, my mother's old sewing box assortment. I enjoy recycling those bits and pieces. I even had some bias strips that I could make into bias tape with my handy, dandy tape maker. This little gadget, available from fabric and notions stores in three different sizes, makes tape really easily. First cut your bias fabric strips the width recommended from your tape maker instructions. In this case it's 1" wide for 1/2" wide single fold tape.
I fed the bias into the tape maker with the wrong side up until it comes out the small end. The handle should be above the gadget. Then I pinned the end coming out of the tape maker to my ironing board and started sliding the tape maker to my left (I'm right handed). I slide the tape maker to the left and gently follow the folded bias coming out of the small end with the iron and Voila! I have single fold bias tape. Great little gadget!
The next gadget was a bodkin. I call it a Pincher Bodkin because of the way it works. One that would hold the fabric well so I could use it to thread the tape through the donut hole easily and quickly instead of using my fingers. This one pinches the fabric and is best used for wider casings, but it's perfect for this job, too.
I just grabbed and pinched one tape end and slid the little ring down towards the end to tighten the hold on the fabric and I was ready to go.

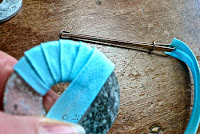
Then I wrapped a piece of the 30" of tape around the weight and held it with my fingers and started wrapping.

The wrap overlap is best if it's 1/2 the width of the tape.
 When I covered the entire weight with fabric I trimmed the leftover bit at the outside edge of the weight which gives just enough fabric to turn under and stitch.
 I turned the ends under to make a little point (but you could just make it straight) and stitched the ends down. You could even glue the ends down. I did find that stitching the ends down was a little awkward because of the angle, but it's just a weight and I'm not too concerned about precise stitching.
And here's the result of a couple of hours of fun. Aren't these lovely? So functional, so colorful and a great way to use up scraps of bias and tape to make something sew useful! Why don't you make some for yourself, or a friend, and use up those bits and pieces of bias tape?


I did this using leftover yarns. It occupies the hands while watching tv and keeps you from eating! A set of weights makes a great gift for sewing friends!
ReplyDeleteMake sure you first wash the weights and dry completely. The weights at our store were a little oily. RSmith
These are so cute!
ReplyDelete